Build workflows configurable by your users
Users today are demanding customization and integrations from every product. Your users may want your product to support custom workflows to automate key user actions. Leverage our Workflow Kit to add powerful user-defined workflows features to your product.
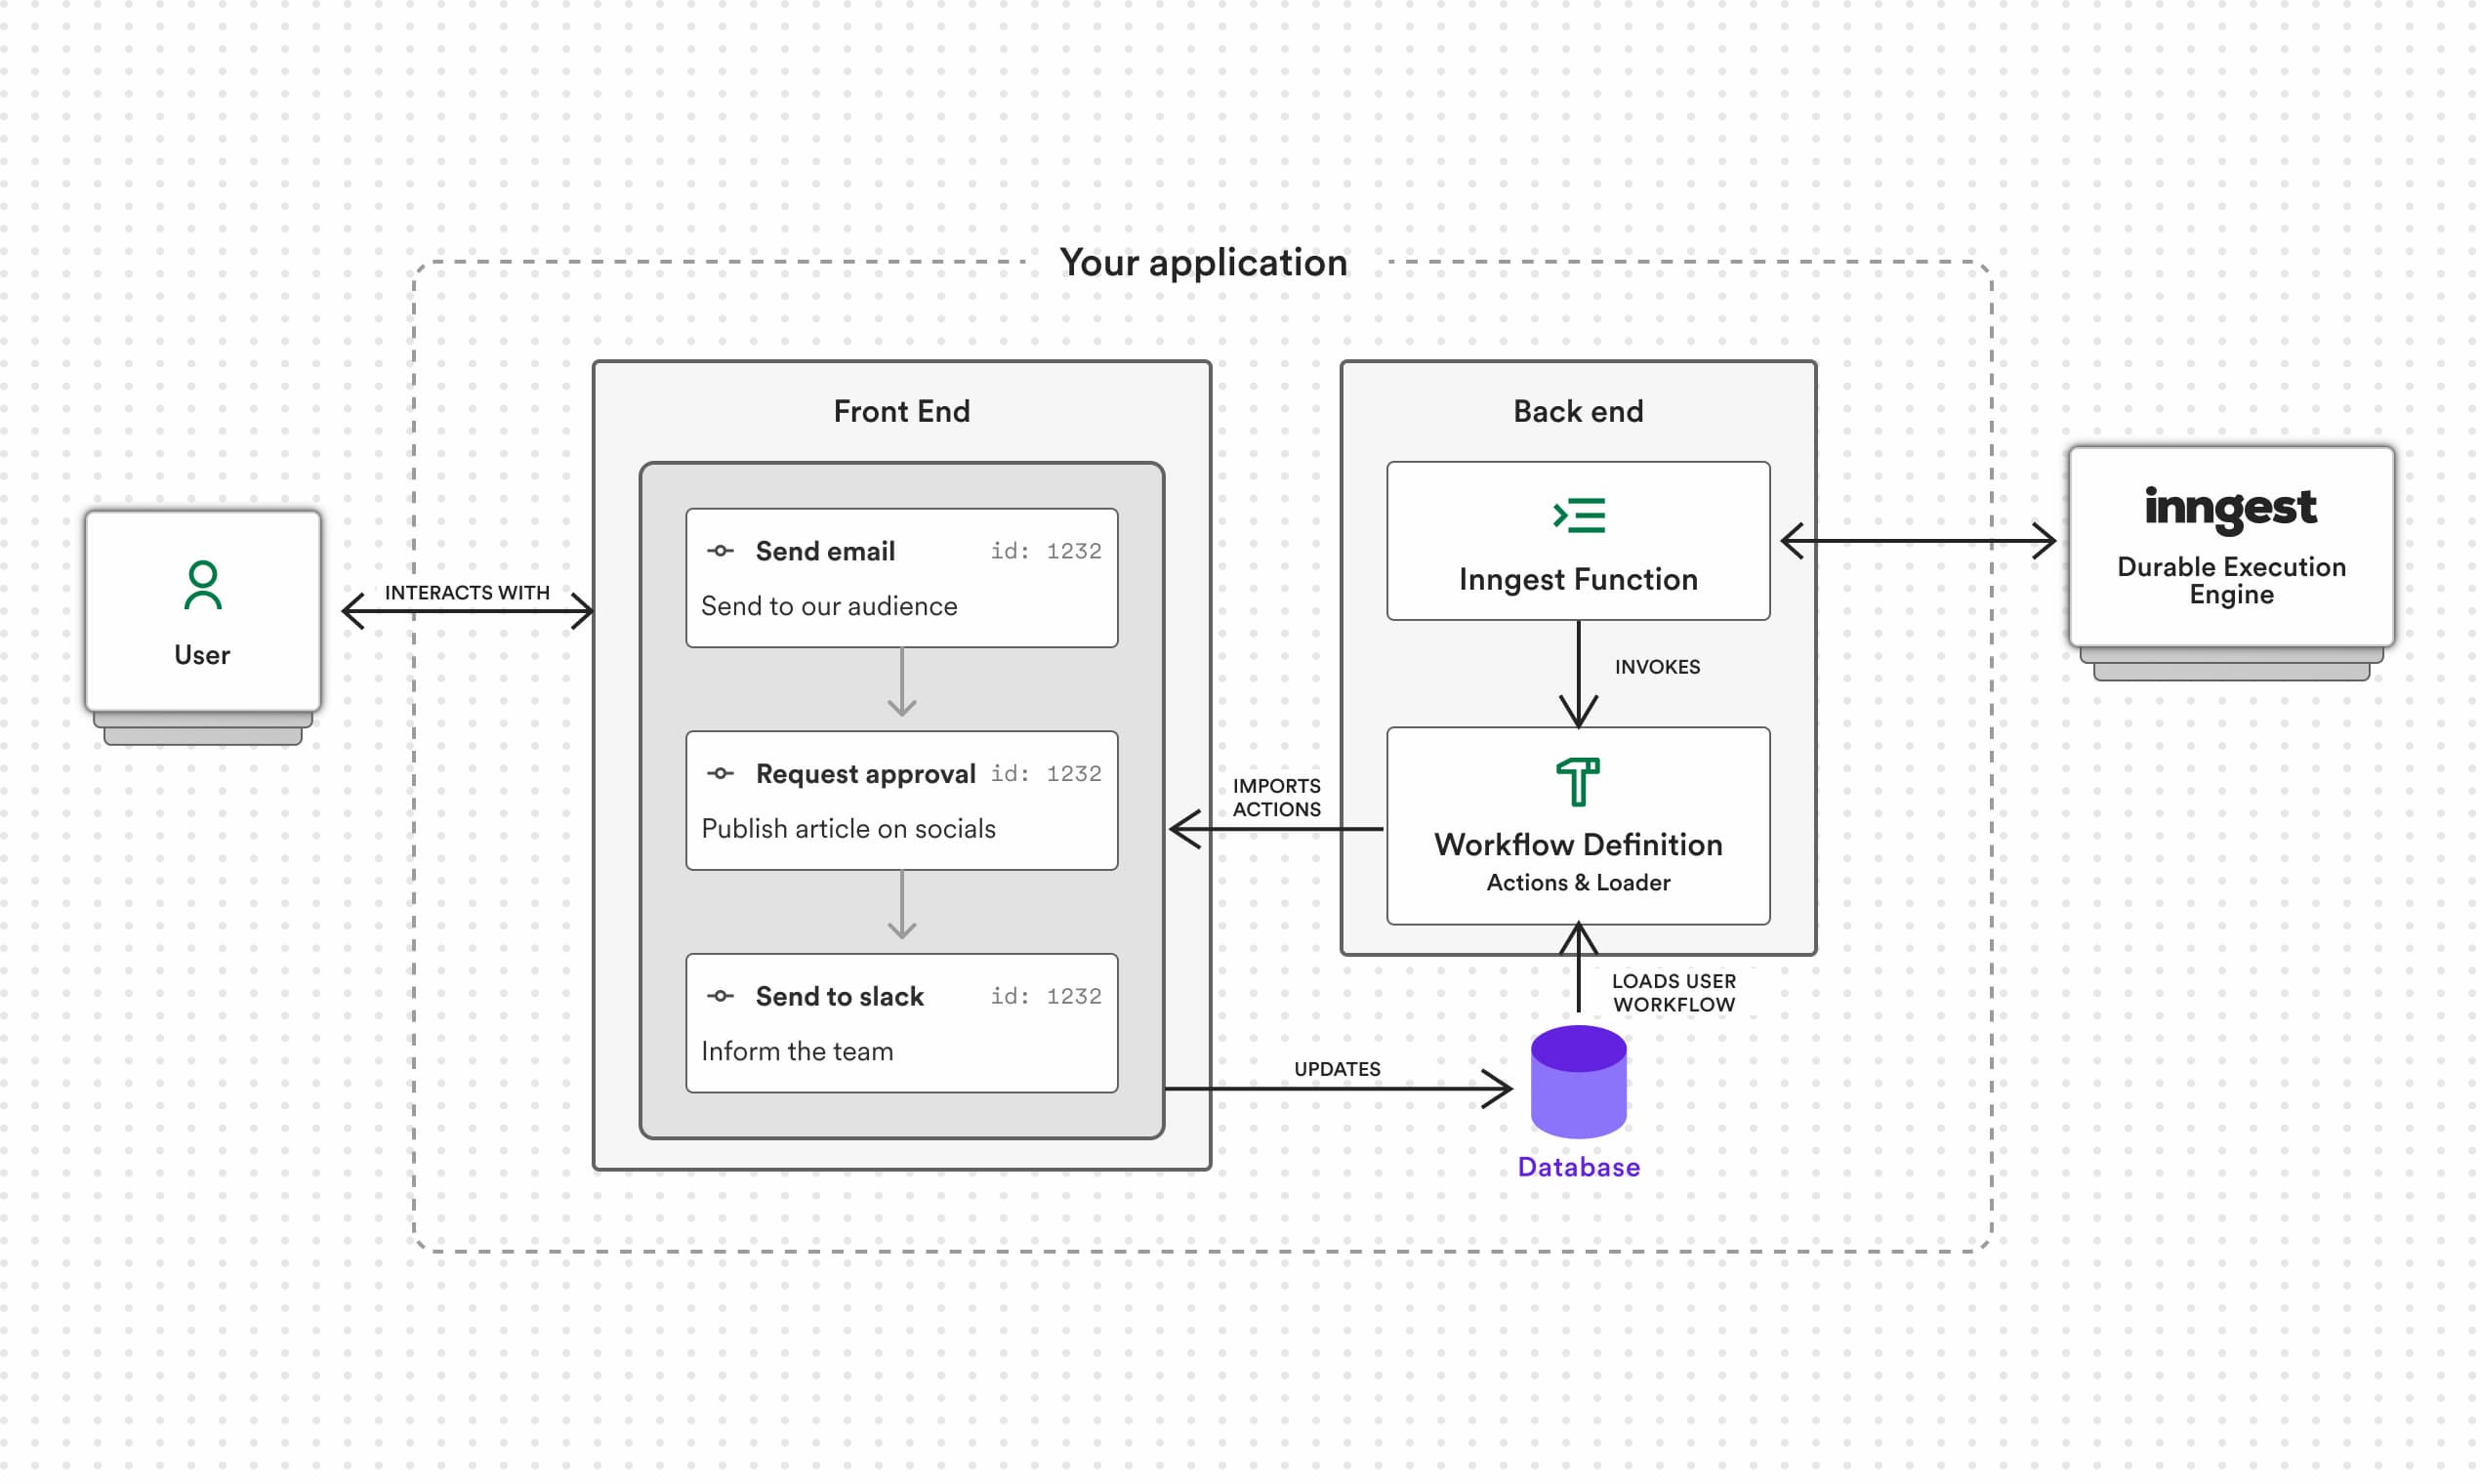
Inngest's Workflow Kit ships as a full-stack package (@inngest/workflow-kit), aiming to simplify the development of user-defined workflows on both the front end and back end:

Use case: adding AI automation to a Next.js CMS application
Our Next.js CMS application features the following blog_posts table:
| Colunm name | Column type | Description |
|---|---|---|
| id | bigint | |
| title | text | The title of the blog post |
| subtitle | text | The subtitle of the blog post |
| status | text | "draft" or "published" |
| markdown | text | The content of the blog post as markdown |
| created_at | timestamp |
You will find a ready-to-use database seed in the repository.
We would like to provide the following AI automation tasks to our users:
Review tasks
- Add a Table of Contents: a task leveraging OpenAI to insert a Table of Contents in the blog post
- Perform a grammar review: a task leveraging OpenAI to perform some grammar fixes
Social content tasks
- Generate LinkedIn posts: a task leveraging OpenAI to generate some Tweets
- Generate Twitter posts: a task leveraging OpenAI to generate a LinkedIn post
Our users will be able to combine those tasks to build their custom workflows.
1. Adding the tasks definition to the application
After installing and setup Inngest in our Next.js application, we will create the following Workflow Actions definition file:
lib/inngest/workflowActions.ts
import { type PublicEngineAction } from "@inngest/workflow/types";

export const actions: PublicEngineAction[] = [
  {
    kind: "add_ToC",
    name: "Add a Table of Contents",
    description: "Add an AI-generated ToC",
  },
  {
    kind: "grammar_review",
    name: "Perform a grammar review",
    description: "Use OpenAI for grammar fixes",
  },
  {
    kind: "wait_for_approval",
    name: "Apply changes after approval",
    description: "Request approval for changes",
  },
  {
    kind: "apply_changes",
    name: "Apply changes",
    description: "Save the AI revisions",
  },
  {
    kind: "generate_linkedin_posts",
    name: "Generate LinkedIn posts",
    description: "Generate LinkedIn posts",
  },
  {
    kind: "generate_tweet_posts",
    name: "Generate Twitter posts",
    description: "Generate Twitter posts",
  },
];
2. Updating our database schema
To enable our users to configure the workflows, we will create the following workflows table:
| Colunm name | Column type | Description |
|---|---|---|
| id | bigint | |
| name | text | The name of the automation |
| description | text | A short description of the automation |
| workflow | jsonb | A Workflow instance object |
| enabled | boolean | |
| trigger | text | The name of the Inngest Event triggering the workflow |
| created_at | timestamp |
Once the workflows table created, we will add two workflow instances records:
- "When a blog post is published": Getting a review from AI
- "When a blog post is moved to review": Actions performed to optimize the distribution of blog posts
using the following SQL insert statement:
INSERT INTO "public"."workflows" ("id", "created_at", "workflow", "enabled", "trigger", "description", "name") VALUES
	(2, '2024-09-14 20:19:41.892865+00', NULL, true, 'blog-post.published', 'Actions performed to optimize the distribution of blog posts', 'When a blog post is published'),
	(1, '2024-09-14 15:46:53.822922+00', NULL, true, 'blog-post.updated', 'Getting a review from AI', 'When a blog post is moved to review');
You will find a ready-to-use database seed in the repository.
3. Adding the Workflow Editor page
With our workflow actions definition and workflows table ready, we will create a new Next.js Page featuring the Workflow Editor.
First, we will add a new Next.js Page to load the worklow and render the Editor:
app/automation/[id]/page.tsx
import { AutomationEditor } from "@/components/automation-editor";
import { createClient } from "@/lib/supabase/server";
import { notFound } from "next/navigation";

export const runtime = "edge";

export default async function Automation({
  params,
}: {
  params: { id: string };
}) {
  const supabase = createClient();
  const { data: workflow } = await supabase
    .from("workflows")
    .select("*")
    .eq("id", params.id!)
    .single();
  if (workflow) {
    return <AutomationEditor workflow={workflow} />;
  } else {
    notFound();
  }
}
The <AutomationEditor> component is instantiated with a workflow instance loaded from the database:
src/components/automation-editor.ts
import { useState } from "react";
import { Editor, Provider, Sidebar } from "@inngest/workflow/ui";

import { actions } from "@/inngest/workflowActions";
import { type Workflow } from "@/lib/supabase/types";

import "@inngest/workflow/ui/ui.css";
import "@xyflow/react/dist/style.css";

export const AutomationEditor = ({ workflow }: { workflow: Workflow }) => {
  const [workflowDraft, updateWorkflowDraft] =
    useState<typeof workflow>(workflow);

  return (
    <Provider
      key={workflowDraft?.id}
      workflow={workflowDraft?.workflow}
      trigger={{
        event: {
          name: workflowDraft.trigger,
        },
      }}
      availableActions={actions}
      onChange={(updated) => {
        updateWorkflowDraft({
          ...workflowDraft,
          workflow: updated,
        });
      }}
    >
      <Editor>
        <Sidebar position="right">
          <></>
        </Sidebar>
      </Editor>
    </Provider>
  );
};
The <Provider> is a controlled component, relying on the workflow={} object to update.
The complete version of the <AutomationEditor> is available on GitHub.
Navigating to /automation/1 renders tht following Workflow Editor UI using our workflow actions:

4. Implementing the Workflow Actions handlers
Let's now implement the logic our automation tasks by creating a new file in lib/inngest and starting with the "Add a Table of Contents" workflow action:
lib/inngest/workflowActionHandlers.ts
import OpenAI from "openai";
import { type EngineAction, type WorkflowAction } from "@inngest/workflow-kit";

import { type BlogPost } from "../supabase/types";

import { loadBlogPost } from "../loaders/blog-post";
import { createClient } from "../supabase/server";
import { actions } from "./workflowActions";


export const actions: EngineAction[] = [
  {
    // Add a Table of Contents
    ...actionsDefinition[0],
    handler: async ({ event, step, workflowAction }) => {
      const supabase = createClient();

      const blogPost = await step.run("load-blog-post", async () =>
        loadBlogPost(event.data.id)
      );

      const aiRevision = await step.run("add-toc-to-article", async () => {
        const openai = new OpenAI({
          apiKey: process.env["OPENAI_API_KEY"], // This is the default and can be omitted
        });

        const prompt = `
        Please update the below markdown article by adding a Table of Content under the h1 title. Return only the complete updated article in markdown without the wrapping "\`\`\`".

        Here is the text wrapped with "\`\`\`":
        \`\`\`
        ${getAIworkingCopy(workflowAction, blogPost)}
        \`\`\`
        `;

        const response = await openai.chat.completions.create({
          model: process.env["OPENAI_MODEL"] || "gpt-3.5-turbo",
          messages: [
            {
              role: "system",
              content: "You are an AI that make text editing changes.",
            },
            {
              role: "user",
              content: prompt,
            },
          ],
        });

        return response.choices[0]?.message?.content || "";
      });

      await step.run("save-ai-revision", async () => {
        await supabase
          .from("blog_posts")
          .update({
            markdown_ai_revision: aiRevision,
            status: "under review",
          })
          .eq("id", event.data.id)
          .select("*");
      });
    },
    }
  },
];
This new file adds the handler property to the existing "Add a Table of Contents" action.
A workflow action handler() has a similar signature to Inngest's function handlers, receiving two key arguments: event and step.
Our "Add a Table of Contents" leverages Inngest's step API to create reliable and retriable steps generating and inserting a Table of Contents.
The complete implementation of all workflow actions are available on GitHub.
5. Creating an Inngest Function
With all the workflow action handlers of our automation tasks implemented,
we can create a Engine instance and pass it to a dedicated Inngest Function that will run the automation when the "blog-post.updated" and "blog-post.published" events will be triggered:
lib/inngest/workflow.ts
import { Engine } from "@inngest/workflow-kit";

import { loadWorkflow } from "../loaders/workflow";
import { inngest } from "./client";
import { actionsWithHandlers } from "./workflowActionHandlers";

const workflowEngine = new Engine({
  actions: actionsWithHandlers,
  loader: loadWorkflow,
});

export default inngest.createFunction(
  { id: "blog-post-workflow" },
  // Triggers
  // - When a blog post is set to "review"
  // - When a blog post is published
  [{ event: "blog-post.updated" }, { event: "blog-post.published" }],
  async ({ event, step }) => {
    // When `run` is called, the loader function is called with access to the event
    await workflowEngine.run({ event, step });
  }
);
Going further
This guide demonstrated how quickly and easily user-defined workflows can be added to your product when using our Workflow Kit.